Introduction: (Initial Observation)
When a volcano erupts, large masses of molten rocks along with smoke and dust exit the top of the volcano known as vent.
Have you ever wondered why these materials come out of a volcano?
Can it be caused by the underground pressure of gases?

In this project you learn about the parts of a volcano, different kinds of volcano and volcanic eruption. You will also make a model of a volcano and display the eruption process and the release of lava or magma caused by the pressure of gases.
Information Gathering:
Find out about volcanoes. Read books, magazines or ask professionals who might know in order to learn about the causes and the locations of volcanoes. Keep track of where you got your information from.
Following are samples of information you may find:
A volcano is a geological landform (usually a mountain) where a substance, usually magma (molten rock of the Earth’s interior) erupts. The name “volcano” originates from the name of Vulcan, a god of fire in Roman mythology. The study of volcanoes is called vulcanology (or volcanology in some spellings).
The Three Big Ones
The last three volcanic eruptions to cause major loss of life were Krakatoa, Indonesia, where 32,000 were killed in 1883; Mt. Pelee, Martinique, where 29,000 were killed in 1902; and Nevada del Ruiz, Colombia, where 23,000 were killed in 1985. Fiery lava was not the culprit in any of these disasters.
Details…
A volcano constitutes a vent, a pipe, a crater, and a cone.
The vent is an opening at the Earth’s surface.
The pipe is a passageway in the volcano in which the magma rises through to the surface during an eruption.
The crater is a bowl-shaped depression at the top of the volcano where volcanic materials like, ash, lava, and other pyroclastic materials are released.
Solidified lava, ashes, and cinder form the cone. Layers of lava, alternate with layers of ash to build the steep sided cone higher and higher.
Information about volcano models are available at:
_ http://volcano.und.nodak.edu/vwdocs/volc_models/models.html
_ http://www.madsci.org/experiments/archive/854444893.Ch.html
_ http://www.aeic.alaska.edu/Input/lahr/taurho/volcano/volcano.html
_ http://www.rockhoundingar.com/pebblepups/volcano.html
_ http://userwww.service.emory.edu/~ekrauss/
_ http://volcanoes.usgs.gov/Products/Pglossary/volcano.html
Question/ Purpose:
We want to see what happens that a volcano erupts. A review of current and past volcano eruptions indicates some kind of under ground pressure that forces the lava out of a volcano. Can we simulate such underground pressure?
Identify Variables:
We use different kind of material that may release gas and create a display similar to a real volcanic eruption. Such material and their quantity are our variables.
Hypothesis:
Baking soda and Vinegar can produce enough gas to simulate a volcanic eruption.
Experiment Design:
Procedure:
Mix baking soda and vinegar in a plastic bottle in different ratios and see which combination and rates of mixture will create the most foam and is the best for a volcanic eruption display.
After you find the best setup and combination, cover the bottle by papers, aluminum foil, clay and other material to make it look like real volcanic mountain. So in the center of your volcano model will be a bottle with chemicals that create the eruption.
In your first experiment use a small cup of vinegar and start adding baking soda to that. Initially baking soda will release gas as soon as it gets to the vinegar. But if you continue, at some point there will be no gas any more. In this way you record the amount of baking soda and vinegar that create gas with each other.
In the second experiment check to see which substance must be at the bottom to create a better and faster reaction, baking soda or vinegar.
In the third experiment add some liquid detergent and some red food coloring to vinegar before reaction with baking soda. Liquid detergent may help the foams last longer and food coloring gives a better look to the erupting volcano. You may also add some flour to the baking soda that you are using to create a more viscose lava.
When the chemical composition is experimented successfully, mount the bottle on the center of a card board and cover it with newspaper and aluminum foil to look like a real volcano.
Baking soda and vinegar are frequently used for volcano projects simply because they are easily accessible and less dangerous. Personally I prefer other methods that create better display and of course have more risk.
In one example you fill up your volcanic cone with Ammonium bichromate and light it up at the display. Ammonium dichromate is a flammable solid and burns very similar to a volcano. It has a nice display and creates a lot of smoke. Use heavy aluminum foil to cover your card board and construct your cone and do your display in an open area. If you want to do this, make your volcano as small as possible (about 2″ high).
The other method that I like is using a solid acid instead of vinegar. Citric acid for example, specially if you get it in powder form can be a good choice. You can mix it dry with baking soda, paint powder such as Iron oxide (red) and detergent powder. So when you are ready to do your demonstration you just add some water and reaction starts.
Need a volcano related graph for your display?
If you need a graph as a part of your display, you must first come up with a question that its answer or data are in the form of a table. You will then gather the information and fill up your data table. Finally you can use your data table to draw a graph.
Following are some sample questions.
What are the numbers of active volcanoes in different continents?
For this question your data table will look like this:
| Country Name | Number of Volcanoes |
How many volcanoes are there in each state of USA?
| State Name | Number of Volcanoes |
You can use the following website for data that you need.
Materials and Equipment:
-
- Plastic bottle (Wide mouth, 5 to 9 inches tall)
- Baking soda
- Vinegar
- Liquid detergent
- Food coloring (red)
- Aluminum foil
- Papers
- Masking tape
Results of Experiment (Observation):
Experiments showed that the reaction between baking soda and vinegar creates some gas, but it is not fast enough to create a violent reaction and simulate a real volcanic reaction. We can stir or shake the mixture to create more gas, but it is not very realistic to shake a volcano to cause eruption.
To speed up the reaction we must fill up the plastic bottle with baking soda while leaving an empty hole in the center of that for adding vinegar.
This hole should be as wide as possible so your bottle will hold more vinegar than baking soda. To do this you need to make paste of baking soda.
Take one spoon liquid detergent, two spoons water, a few drops of food coloring and start adding baking soda slowly while mixing. Continue adding baking soda until you get a sticky paste. If your bottle is very small and your volcano is small too, this should be enough. For larger bottles you may need to repeat this part to make more paste. Apply a thin layer of this paste to the inner sides of your bottle (about 1/4″ tick).

The reason that we add liquid detergent is that bobbles are unstable and disappear very fast. Liquid detergent will make bubbles last for a few seconds.
Do this a few times and add vinegar to see how much foam comes out. After a few experiments you will be ready for your final product.
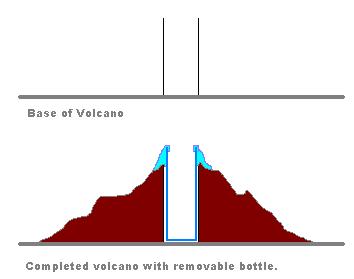
When your bottle is ready for final volcano, take a card board and using a masking tape secure the bottle in the center of the card board.
Before you start building your volcanic mountain around the bottle, you may also want to use some glue or masking tape around the neck of the bottle. This will prevent the foam from going inside your mountain.


You can almost use anything that can look like a mountain to cover your bottle. I used some packing paper and cut a cross on the center of that to make it easier to be attached to the neck of the bottle.


Cover the bottle with your mountain material such as paper or aluminum foil and paint it. Since my paper was not large enough, I has to use some extra magazine paper to give more body to the mountain.
Before painting, cover the the bottle with something to make sure that paint will not enter the bottle. I used spray paint, but you can use any latex paint as well. (Don’t add water).


I painted my volcano in the backyard, spray paints release harmful fumes and it’s better not to use them inside a building. While the paint was still wet, I also spread some sand to make it more natural. Paint will act like a glue and holds sand in place.
When your volcano is ready and it is your turn to display, fill up a small bottle or a test tube with vinegar and pour it in to your volcano. The eruption will start in a few seconds and lasts for a few minutes.
Remember you can do it only once and when the volcano erupts, it gets wet and you can not repeat your display unless you build everything from the beginning.

Final display that will last only a few seconds may look like this. As you notice I did not use food coloring and my lava is white. Also I used black color to paint the mountain that is not the best choice. If you have enough time for your project, you may use multiple colors and food coloring to get a better display.

Calculations:
Calculate what ratio of baking soda and vinegar produce the most gas.
Summery of Results:
Summarize what happened. This can be in the form of a table of processed numerical data, or graphs. It could also be a written statement of what occurred during experiments.
It is from calculations using recorded data that tables and graphs are made. Studying tables and graphs, we can see trends that tell us how different variables cause our observations. Based on these trends, we can draw conclusions about the system under study. These conclusions help us confirm or deny our original hypothesis. Often, mathematical equations can be made from graphs. These equations allow us to predict how a change will affect the system without the need to do additional experiments. Advanced levels of experimental science rely heavily on graphical and mathematical analysis of data. At this level, science becomes even more interesting and powerful.
Conclusion:
Using the trends in your experimental data and your experimental observations, try to answer your original questions. Is your hypothesis correct? Now is the time to pull together what happened, and assess the experiments you did.
The pressure of underground gases in a volcanic mountain will force the molten material out of the volcanic mountain.
Related Questions & Answers:
Q. How can we make a volcano that errupts more than once?
A. Instead of attaching the bottle to the base board, make and attach a cylinder from heavy paper that can hold the bottle. In this way you will be able to remove the bootle for refill or just use a second bottle that you have already prepared to repeat the erruption test.
When you do one eruption experiment, your volcano will get wet. So for multiple eruptions make your volcanic mountain from more durable material. Heavy paper with lots of paint can resist a few tests, but for more tests, make your volcanic mountain from plastics, aluminum foil, wood or even chalk (Plaster of Paris) that will be much heavier.
Possible Errors:
If you did not observe anything different than what happened with your control, the variable you changed may not affect the system you are investigating. If you did not observe a consistent, reproducible trend in your series of experimental runs there may be experimental errors affecting your results. The first thing to check is how you are making your measurements. Is the measurement method questionable or unreliable? Maybe you are reading a scale incorrectly, or maybe the measuring instrument is working erratically.
If you determine that experimental errors are influencing your results, carefully rethink the design of your experiments. Review each step of the procedure to find sources of potential errors. If possible, have a scientist review the procedure with you. Sometimes the designer of an experiment can miss the obvious.
References:
Other receipes attached may also give you new ideas on how to make your model.
Model Volcano Project
James Signorelli
Dwight Morrow High School
Science Department
The purpose of this project is to produce a model that simulates the building processes found in actual volcanoes. These processes include the layering of ash from the eruption to builds the cinder cone. They also show how the mass of the cone in time causes the Caldera to form when the crater collapses in on itself. A model can also be made that simulates the violent eruptions of a composite volcano. For this model, additional chemicals are required to produce the violent explosive eruption responsible for hurling dust and pyroclastic bombs into the air.
Phase #1 – the mountain
A. Obtain a piece of thick corrugated paper and line with several layers of aluminum foil. This is your primary fire shield.
B. Place a large, ceramic crucible in the center of the board and anchor with wall board joint compound. [available from Home Depot at $ 10.00 / 5 gallon pail]
C. Make a skeleton of the mountain with shaped layers of corrugated paper in the form of a top-o-graphic map.
D. Cover the layers with the wall board joint compound until your mountain has the desired shape.
E. Allow model to dry for several days. You may scratch in detail such as ravines and depressions before the plaster hardens. Plaster has a natural tendency to shrink and crack, adding realism to the surface of the model.
F. Paint the model by first spraying with BBQ black. Use Tempera paint for all other detail.
Phase #2 the chemicals [cinder cone model]
Perform this Demonstration in a fume hood or outdoors for proper ventilation. Treat the ash as hazardous chemical waste and recycle for proper disposal. Vacuum or sweep up all ash.
A. Obtain Ammonium Dichromate from the chemical storage area of your school. It is stored in the oxidizer cabinet.
B. Place approximately one table spoon of Ammonium Dichromate into the crucible.
C. Light the chemical with a match and step back. The effect is more graphic in a darkened room.
D. The orange Ammonium Dichromate burns in a firey plume (fountain) into chromic oxide, a green colored ash.
E. The ash builds layer upon layer to form the cone.
F. As the ash cone reaches higher and higher, it becomes unstable and collapses in on itself to form the broad Caldera, from the crater.
Phase #3 the chemicals [composite volcano model]
This model requires the use of an explosive mixture of chemicals. Do Not use more than ½ teaspoon and do not pack it into the crucible.
A. In a non-flammable container, mix equal parts of table sugar and Potassium Chlorate. Stir, do not use a mortar & pestle.
This mixture does not like friction !
B. Place approximately ½ teaspoon of the mixture into the large crucible.
C. Completely cover this mixture with the Ammonium Dichromate as in the Cinder Cone model. None of the sugar mixture should be visible. This works best if ¾ inch or more of the dichromate crystals covers the sugar mixture.
D. Light the model as in phase #1. Stand back! When the dichromate eventually reaches the sugar layer, the volcano becomes Mt. Saint Helen. The carbon balls (pyroclastic bombs) land several inches from the model. The center of the cinder cone is blown away, producing a very wide crater. If you dont tell the students that this final reaction is due any minute, the surprise really gets their interest!
Please& Use professional judgement.
Dont allow students to handle any of the chemicals.
Practice safe use of all chemicals
Start with small quantities and develop your learning curve before trying this in front of a class.
Treat all fuel, ash and waste as a hazardous chemical. Dispose of properly.
Model:
-
- 1 cup vinegar
- Red food color
- 2 generous drops of dish washing soap
- 2 tablespoons of baking soda
- a funnel
Build a volcano of clay around a container that is thin and tall. You can use an empty tin can. You cut the top off a soda bottle or use pint milk cartons. Instead of clay you can mix flour with water into a paste and let it dry. Plaster of paris is also good for the outside. Mix the liquids together. When 2 tablespoons of baking soda are added a bright red foamy lava comes out.
Experiment:
-
- Present two clear containers (bottles, jars,) of equal volume and shape. Add 1 cup of vinegar to each container. You will need a tray to catch the overflowing foam.
- In one container add the drops of dish washing soap. Do not add any soap to the other.
- Measure the tablespoons of baking soda into two other cups so that it can be dumped into the two containers of vinegar at the same time.
- Have the students name the only difference between the mixtures in the two containers. (One has soap.)
- Have students speculate or predict in writing if the two will appear different or not and what we will see.
- Dump the baking soda from the cups into the containers at exactly the same time.
- Have students read what they wrote and use adjectives to describe how the two mixtures are different. Does one formula last longer? What was the only difference between the two cases?
