Introduction: (Initial Observation)
In a guided tour from an old zinc mine in New Jersey, I had chance to see the real application of fluorescence and phosphorescence in mining and identifying rocks. In a dark place of the mine we stopped and the tour guide turned off the lights and turned on UV lights. Suddenly all the rocks started to emit visible light in brilliant colors. This amazing experience encouraged me to learn more about UV lights and fluorescent and phosphorescent substances.
In this project I will study, examine and identify fluorescent and phosphorescent material specially minerals that I can find. I like to know what minerals and what household material are fluorescent. Among fluorescent material I will also search for those which are phosphorescence as well.
Information Gathering:
Find out about what you want to investigate. Read books, magazines or ask professionals who might know in order to learn about the effect or area of study. Keep track of where you got your information from.
Phosphorescence= A quasistable electron excitation state involving a change of spin state (intersystem crossing) which decays only slowly. In phosphorescence, light emitted by an atom or molecule that persists after the exciting source is removed. It is similar to fluorescence, but the species is excited to a metastable state from which a transition to the initial state is forbidden. Emission occurs when thermal energy raises the electron to a state from which it can de-excite. Therefore, phosphorescence is temperature-dependent.
Fluorescence= A luminescence phenomenon in which electron de-excitation occurs almost spontaneously, and in which emission from a luminescent substance ceases when the exciting source is removed. In fluorescent materials, the excited state has the same spin as the ground state.
Phosphorescence and Fluorescence
Phosphorescence and Fluorescence happen when atoms in the material becomes excited. Atoms can become excited in two ways. The first way for an atom to become excited is by thermal excitation which is where the electrons are heated in some way which causes them to rise to a higher energy level. The second way in which an atom can become excited is by electron collision which is where two electrons collide causing them to rise to a higher energy level. Phosphorescent and fluorescent materials both contain atoms that are easily excited. Phosphorescence and fluorescence differ in the amount of time it takes their excited atoms to return to their normal energy levels. When an atom of a fluorescent material gets excited it returns to it’s normal energy level immediately. When a phosphorescent material gets excited it can stay at a higher energy level for quite some time.
Phosphorescence
Many erroneous statements have been made with regard to the phosphorescence of diamond. Thus it has been stated that diamond phosphoresces in darkness after exposure to the direct rays of the sun, the phosphorescence being specially marked after exposure to blue light, and less so after exposure to red light. It is even said that after being screened by a board or paper from the direct rays of the sun, so that the stone is exposed to diffuse daylight only, it will be seen to glow brightly when placed in darkness.
Exact researches, however, have proved that only very few diamonds phosphoresce after exposure to sunlight, and that neither the direct rays of the sun nor intense artificial light cause phosphorescence in the majority of stones. Streeter reports that a yellow stone of 115 carats, after exposure to lime-light lit up a dark room; and Edwards describes a water-clear diamond of 92 carats, which after one hour’s exposure to electric light emitted in a dark room a light which lasted for twenty minutes, and was so strong that a sheet of white paper placed near the stone could be distinctly seen. Of 150 diamonds of various forms, sizes and qualities examined by Kunz, only three showed the phenomenon of phosphorescence after exposure to the light of the electric arc.
Although exposure to light has in diamond so small an effect in exciting phosphorescence, rubbing the stone easily produces the phenomenon. Kunz observed that all the diamonds he examined, without exception, became self-luminous after being rubbed on wood, leather, woolen or other material. Some stones needed only to be drawn once across the substance, especially if it were of wool, to render them self-luminous; the most marked phosphorescence was, however, developed in stones by rubbing on wood against the grain. According to other statements, rubbing on metals (iron, steel, copper) is effective.
X-rays induce phosphorescence in most of diamonds, if not all. This property is used to separate diamonds from concentrate. The compressed air powered x-ray machines replaced old grease tables.
Source…
Minerals that light up when exposed to ultraviolet light, x-rays, or cathode rays are called fluorescent. If the emission of light continues after the light is cut off, they are said to be phosphorescent.
Some specimens of the same mineral show fluorescence while other don’t. For example some crystals of fluorite (CaF 2 ) show fluorescence and others do not. Other minerals show fluorescence frequently, but not always. These include – scheelite (CaWO 4 ), willemite (Zn SiO ), calcite (CaCO ), scapolite (3NaAlSi O8 . (NaCl – CaCO ), and diamond (C).
How to identify minerals?
The first thing to have when identifying minerals is a good field guide. With your field guide in hand, you will be able to compare the physical properties of a mineral to descriptions and pictures in your guide.
Most common minerals can be identified by inspecting or testing their physical properties. These properties are color, streak, transparency, luster, hardness, cleavage, fracture, specific gravity, and crystal form.
Question/ Purpose:
What do you want to find out? Write a statement that describes what you want to do. Use your observations and questions to write the statement.
Identify Variables:
When you think you know what variables may be involved, think about ways to change one at a time. If you change more than one at a time, you will not know what variable is causing your observation. Sometimes variables are linked and work together to cause something. At first, try to choose variables that you think act independently of each other.
Hypothesis:
Based on your gathered information, make an educated guess about what types of things affect the system you are working with. Identifying variables is necessary before you can make a hypothesis.
Experiment Design:
Design an experiment to test each hypothesis. Make a step-by-step list of what you will do to answer each question. This list is called an experimental procedure. For an experiment to give answers you can trust, it must have a “control.” A control is an additional experimental trial or run. It is a separate experiment, done exactly like the others. The only difference is that no experimental variables are changed. A control is a neutral “reference point” for comparison that allows you to see what changing a variable does by comparing it to not changing anything. Dependable controls are sometimes very hard to develop. They can be the hardest part of a project. Without a control you cannot be sure that changing the variable causes your observations. A series of experiments that includes a control is called a “controlled experiment.”
Materials and Equipment:
Description
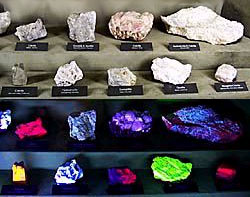
Minerals in this display are exposed to germicidal fluorescent lamps, in conjunction with a UV quartz grid, and through blue-black quartz filters. The results are varying color effects depending on the mineral. For example, the calcite in this display is excited by the short wave UV light and glows bright red (if exposed to long wave UV light, the calcite doesn’t glow at all). Other forms of high energy, such as X-rays and heat, may also cause fluorescence in minerals. Some minerals continue to glow when the light is turned off, a condition called phosphorescence.
Results of Experiment (Observation):
Experiments are often done in series. A series of experiments can be done by changing one variable a different amount each time. A series of experiments is made up of separate experimental “runs.” During each run you make a measurement of how much the variable affected the system under study. For each run, a different amount of change in the variable is used. This produces a different amount of response in the system. You measure this response, or record data, in a table for this purpose. This is considered “raw data” since it has not been processed or interpreted yet. When raw data gets processed mathematically, for example, it becomes results.
Calculations:
Description
Summary of Results:
Summarize what happened. This can be in the form of a table of processed numerical data, or graphs. It could also be a written statement of what occurred during experiments.
It is from calculations using recorded data that tables and graphs are made. Studying tables and graphs, we can see trends that tell us how different variables cause our observations. Based on these trends, we can draw conclusions about the system under study. These conclusions help us confirm or deny our original hypothesis. Often, mathematical equations can be made from graphs. These equations allow us to predict how a change will affect the system without the need to do additional experiments. Advanced levels of experimental science rely heavily on graphical and mathematical analysis of data. At this level, science becomes even more interesting and powerful.
Conclusion:
Using the trends in your experimental data and your experimental observations, try to answer your original questions. Is your hypothesis correct? Now is the time to pull together what happened, and assess the experiments you did.
Related Questions & Answers:
What you have learned may allow you to answer other questions. Many questions are related. Several new questions may have occurred to you while doing experiments. You may now be able to understand or verify things that you discovered when gathering information for the project. Questions lead to more questions, which lead to additional hypothesis that need to be tested.
Possible Errors:
If you did not observe anything different than what happened with your control, the variable you changed may not affect the system you are investigating. If you did not observe a consistent, reproducible trend in your series of experimental runs there may be experimental errors affecting your results. The first thing to check is how you are making your measurements. Is the measurement method questionable or unreliable? Maybe you are reading a scale incorrectly, or maybe the measuring instrument is working erratically.
If you determine that experimental errors are influencing your results, carefully rethink the design of your experiments. Review each step of the procedure to find sources of potential errors. If possible, have a scientist review the procedure with you. Sometimes the designer of an experiment can miss the obvious.
